Fliplet.Payments
Fliplet.Payments
Accept Stripe payments and checkout in Fliplet apps via Fliplet.Payments, with a products data source and webhook-driven order tracking.
Before you start, make sure you have signed up for a Stripe account on their website as it will be required in the very first steps of the integration.
Dependency name: fliplet-payments
Data models and key concepts
Adding payments to your apps has the following four requirements:
- An app is configured to use payments, including adding the required settings and secrets which are securely stored in our backend.
- You have created a Stripe account and configured the Fliplet webhook URL on their dashboard.
- A Data Source is created with a specific structure to manage the list of products you want the app users to be able to buy.
- Custom code is added in your app screen to let users buy the products and complete the checkout process using our simple JS APIs.
Optionally, an app can also configure payment fulfilment so Fliplet records a completed payment onto one of your data source rows from the Stripe webhook, rather than relying on the buyer’s browser returning to your app. See Recording a payment when the buyer’s browser does not come back.
Configuration
To start setting up payments for your app, add fliplet-payments to your app or screen dependencies.
1. Configure the payment settings
An app must first configure its payment settings before users are able to buy products. Configuring the app is done by making a JS API or RESTful API request including the following information:
provider:string- the payment provider; we currently only supportstripeas valueproviderPublicKey:string- the publisheable key from StripeproviderPrivateKey:string- the secret key from StripeproductsDataSourceId:number- the ID of the Data Source listing the products your users can buy
Note: the following request must be made only once and from an authenticated Studio user. You can however call it at any time to update the configuration.
// Run this once while logged in as a Studio user
// to set up or update the configuration.
Fliplet.Payments.Configuration.update({
  provider: 'stripe',

  // Get these from https://dashboard.stripe.com/apikeys
  providerPublicKey: 'pk_live_abcdef123456',  // Publisheable key
  providerPrivateKey: 'sk_live_abcdef123456', // Secret key

  productsDataSourceId: 123  // ID of the products data source
}).then(function (result) {
  // Configuration has been set successfully.
  // Your app is almost ready to start checkout sessions.

  console.log('Webhook URL to configure in Stripe', result.webhookUrl);
  // result.webhookUrl must be configured on your payment provider,
  // see the next section of the docs here below.
  // Here's an example of what the URL looks like:
  // https://api.fliplet.com/v1/billing/webhook/apps/8a85a2edc3f3a774ac06f

});
2. Configure webhooks in the payment provider
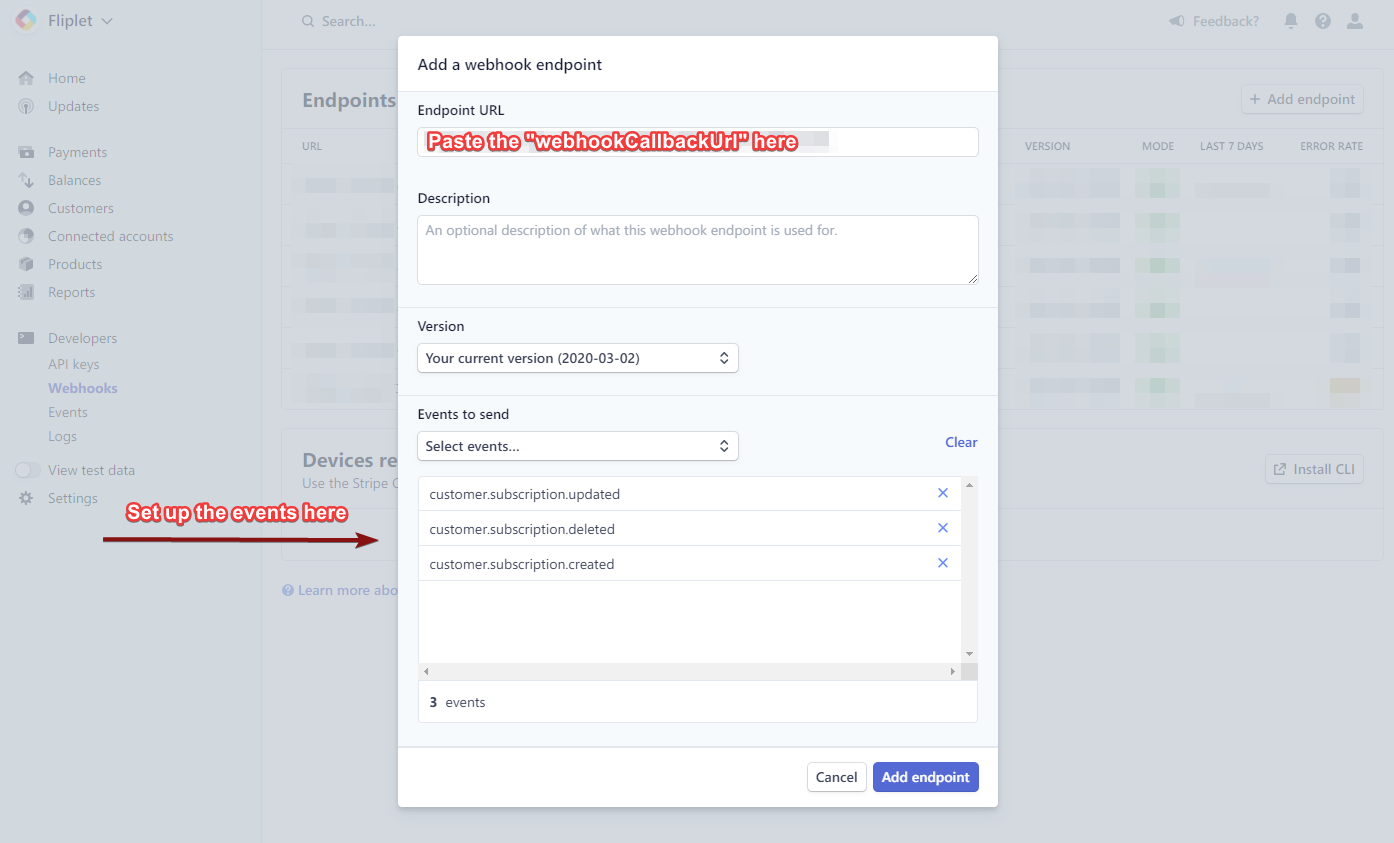
Before you start accepting payments, webhooks must be set up in your payment provider to notify Fliplet about charges made from buying products and subscriptions.
The previous JS API (Fliplet.Payments.Configuration.update) returns a webhookUrl in its promise callback which you should note down and add into Stripe:
- Go to the Developers > Webhooks section in Stripe
- Click
Add endpoint - Add the value you got from
webhookUrlin theEndpoint URLfield. The value has a format similar to this URL:https://api.fliplet.com/v1/billing/webhook/apps/8a85a2edc3f3a774ac06f - Choose the following events to be sent:
checkout.session.completedcheckout.session.async_payment_succeededcustomer.subscription.updatedcustomer.subscription.deletedcustomer.subscription.created
The two checkout.session events are what let Fliplet record a completed payment on
its own, without depending on the buyer’s browser coming back to your app. Enable both:
completed covers the ordinary card path, and async_payment_succeeded is the
settlement of a delayed payment method, which can arrive minutes or days later. An
endpoint subscribed only to the customer.subscription events will never record a
one-off checkout.
Fliplet does not act on checkout.session.async_payment_failed. If a delayed payment
method fails after your screens have already marked a row as paid, that row is not
reverted. Check this before you offer delayed methods such as SEPA Direct Debit or
Klarna, and handle failed settlements yourself.
Save changes to add the endpoint, then copy the value of the Signing secret:
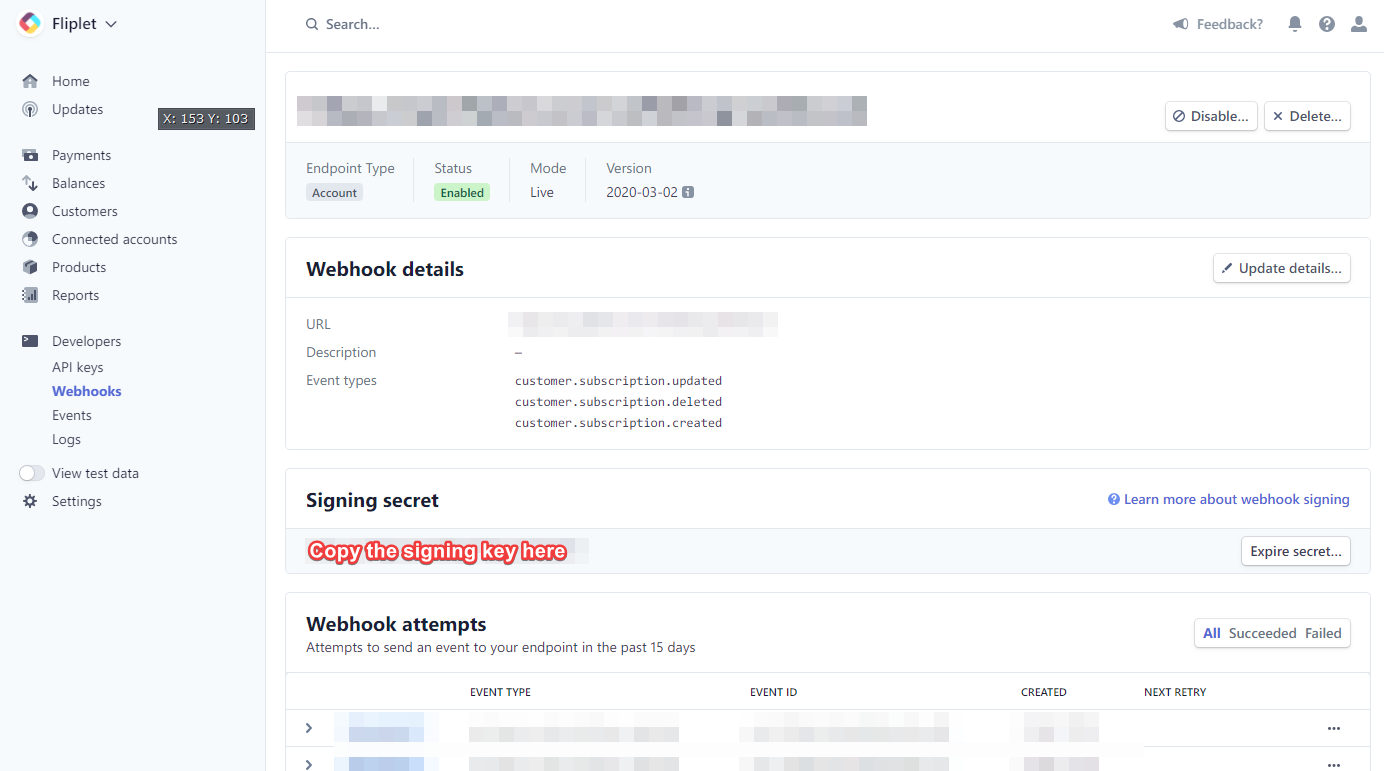
Finally, configure your signing secret in the Fliplet app by running the following JS API as a logged in Studio user:
// Run this once while logged in as a Studio user
// to set up or update the signing secret from Stripe.
Fliplet.Payments.Configuration.updateSigningSecret('whsec_123abc').then(function () {
  // Configuration has been set successfully.
  // Your app is now ready to start checkout sessions.
});
Once the webhook has been set up, you can start to configure your data source with the products you want to list.
3. Configure the products
Use the “App data” section of Fliplet Studio or the Data Sources JS APIs to manage a list of products for users to buy. Each product requires the following information:
- Name:
string - Price:
float - Price ID:
string- the ID or hash as found in your payment provider
Here’s an example Data Source containing a few products:
| Name | Description | Price | Price ID |
|---|---|---|---|
| Premium plan | A fancy premium plan | 1.00 | price_1HAuW7JNczvHKhMA2lbd8xjs |
| Gold plan | A even fancier gold plan | 2.50 | price_2HAuW7sNczvfKhMA2lbd1xjx |
Once you have set up one or more products you’re ready to start accepting payments in your app.
4. Add code to initiate a checkout session
Our JS APIs allow your apps to read the list of products you have configured and then initiate a checkout process for one of your products.
You want to first read the list of products, then let the user choose one (and its quantity) and then initiate a checkout session.
These are the two JS APIs you need to use to achieve what has been described above:
Fliplet.Payments.Products.get()- fetch the list of products you have configured in the data sourceFliplet.Payments.Checkout.create(options)- initiate a checkout session to let the user buy a product
Moreover, although not required it is recommended that you use the following JS API to create a customer on Stripe:
Fliplet.Payments.Customers.create(options)- create a customer (if it’s existing then it just gets returned)
Here’s a full example to help you getting started:
// Get the list of products
Fliplet.Payments.Products.get().then(function (products) {

  // Create or get a customer by email
  return Fliplet.Payments.Customers.create({
    email: 'john@example.org'
  }).then(function(customer) {
    // Save customer.id if required

    // Initiate a checkout session to the payment provider
    return Fliplet.Payments.Checkout.create({
      // Options for the payment provider.
      // Refer to the Stripe documentation for the list
      // of available options you can use:
      // https://stripe.com/docs/api/checkout/sessions/create
      mode: 'payment',
      payment_method_types: ['card'],
      customer: customer.id,

      // Specify the list of items
      // https://stripe.com/docs/api/checkout/sessions/create#create_checkout_session-line_items
      line_items: [
        {
          price: products[0]['Price ID'],
          quantity: 1
        },
        {
          price: products[1]['Price ID'],
          quantity: 2
        }
      ]
    }).then(function onCheckoutCompleted(session) {
      // The checkout session has been completed.
      // The user was successfully charged for the product.
      //
      // Resolves with the checkout session: id, currency, customer,
      // customer_details and customer_email.
      console.log(session.id);
    }, function onCheckoutFailed(err) {
      // The checkout did not complete. See "Telling a failed payment
      // from an unfinished one" below before showing this to a buyer.
    });
  });
});
Recording a payment when the buyer’s browser does not come back
Everything in the example above runs in the buyer’s browser. If that browser closes, loses its connection, or is put to sleep by the phone before Stripe’s confirmation is handled, the payment succeeds in Stripe while your app never learns about it. The buyer is charged, their order stays pending, and nothing you can write in the page fixes it — the code that would react is in the page that has gone away.
Fliplet can record these payments for you from the Stripe webhook instead. Configure
paymentFulfilment on the app and Fliplet will mark the row itself when Stripe
confirms the payment.
This only covers checkout sessions created with Fliplet.Payments.Checkout.create().
Fliplet marks each of those sessions when it creates them, and the webhook ignores any
session without that mark, including ones that set client_reference_id. Sessions
from Stripe Payment Links, the Stripe Dashboard or another integration are never
recorded.
paymentFulfilment is an app setting, and it takes this shape:
{
  "paymentFulfilment": {
    "dataSourceId": 123456,
    "statusColumn": "Payment Status",
    "paidValue": "Paid",

    // Optional columns, filled only where the row leaves them blank
    "sessionColumn": "Stripe Session ID",
    "paymentIntentColumn": "Stripe Payment Intent ID",
    "customerColumn": "Stripe Customer ID",

    // Required guards -- a target missing either will not fulfil
    "expectedCurrency": "eur",
    "minimumAmountTotal": 100,

    // Runs the data source's own update hooks for the recorded payment.
    // Off by default -- read "Update hooks" below before turning it on.
    "runUpdateHooks": false
  }
}
expectedCurrency and minimumAmountTotal (in the currency’s smallest unit) are
mandatory. A session in another currency, or one that collected less than
minimumAmountTotal, will not mark a row paid.
minimumAmountTotal is one minimum for the whole app. Fliplet does not compare
the amount charged with the price of the particular row being paid for. If your app
sells more than one price, a checkout for the cheaper item can mark a row for the more
expensive one as paid, as long as it clears the minimum. Set minimumAmountTotal to
your lowest genuine price, and do not rely on it to protect higher-priced rows. Those
need their own check that the amount paid matches the row.
Update hooks
When runUpdateHooks is true, the webhook’s write fires the data source’s update
hooks, such as confirmation emails or workflow calls. Your screens usually write the
same row when the buyer returns from Stripe, and that write fires the same hooks. An
update hook with no condition therefore runs twice: two confirmation emails, or a
workflow called twice.
Before turning runUpdateHooks on, check every update hook on the data source. Each
one should fire only on the change it cares about, for example when Payment Status
becomes Paid, and be safe to run twice. Decide whether the webhook or your screens
send the confirmation, not both.
What the data source has to satisfy
The data source you point at must belong to the master app, the one you edit in
Studio. Fliplet will not write into a data source owned by any other app, including
the app’s own published copy or an unrelated app in the same organization.
statusColumn must also be a real column on that data source. Fliplet only checks
this when the data source has a column list. If the list is empty, a misspelled
statusColumn is not caught: the value is written under that misspelled key and the
real status column stays unchanged.
Both of these fail silently from the app’s point of view: the payment is not recorded, no error reaches your screens, and the row is left exactly as it was. If payments stop being recorded after a change, check these before anything else.
This matters most when an app is copied. The copy inherits paymentFulfilment
verbatim, still pointing at the original app’s data source, so nothing is recorded
until you repoint dataSourceId at the copy’s own data source. Checkout fails too, and
that one is not silent: the row named by client_reference_id does not exist in the
configured data source, so the ownership check refuses it with a 403.
Setting it on the app
Save it with the RESTful API, against the master app’s ID (the app you edit in Studio), authenticated as a Studio user with edit rights on that app. See Saving settings for how to make the request.
POST v1/apps/:masterAppId/settings
{
  "paymentFulfilment": {
    "dataSourceId": 123456,
    "statusColumn": "Payment Status",
    "paidValue": "Paid",
    "sessionColumn": "Stripe Session ID",
    "paymentIntentColumn": "Stripe Payment Intent ID",
    "customerColumn": "Stripe Customer ID",
    "expectedCurrency": "eur",
    "minimumAmountTotal": 100
  }
}
The endpoint returns a 403 for a published app’s ID, so always use the master’s.
The request merges into the app’s existing settings at the top level only: other
settings are left alone, but paymentFulfilment itself is replaced as a whole. Always
send the complete object. Sending only the fields you want to change deletes the rest,
and a value without expectedCurrency and minimumAmountTotal stops fulfilment
working.
Do not use Fliplet.App.Settings.set() for this. It saves to whichever app the code is running in. In a published app that is the published copy, which the endpoint refuses with a 403. In Studio preview and Fliplet Viewer it makes no request at all: it only changes the settings held in the page, the promise resolves, and nothing is saved.
Which copy of the setting is used
Checkout and the webhook do not read the setting from the same app:
- Checkout (the ownership check,
ownershipTokenColumn, and the data source the session is tied to) uses the published app’s copy, which it receives when you publish. - The webhook (the guards,
statusColumn,paidValue, the optional columns andrunUpdateHooks) always uses the master app’s copy. Changes to those fields apply to the next payment, without republishing.
The two copies must name the same dataSourceId. Each session is tied to the data
source the published app named at checkout, and the webhook ignores a session whose
data source does not match the master’s. If you change dataSourceId on the master and
do not republish, every payment is silently not recorded. Republish whenever you
change paymentFulfilment, so both copies stay the same.
Fliplet.App.Settings.get('paymentFulfilment') in the published app shows the
checkout copy, not the one the webhook uses. To see the webhook’s copy, read the master
app’s settings with GET v1/apps/:masterAppId/settings.
Which row gets marked is taken from client_reference_id on the checkout session, so
your checkout call must set it:
Fliplet.Payments.Checkout.create({
  mode: 'payment',
  line_items: lineItems,
  client_reference_id: entryId.toString()
});
Proving the buyer owns the row
client_reference_id arrives from the browser, and entry IDs are sequential and
guessable. Fliplet therefore checks, before creating the session, that the caller is
entitled to the row they named — otherwise a buyer could pay against someone else’s
order and have it fulfilled on their behalf.
The check passes in either of two ways.
By the data source’s access rules. If your buyers sign in to the app, and the rules allow that user to update their own row, nothing further is needed.
By a per-row token. Apps whose buyers have no account cannot satisfy any rule —
with no identity there is nothing for loggedIn or a user rule to match. For those
apps, name a column holding a per-row secret the buyer already has, such as a
registration UUID or order reference:
{
  "paymentFulfilment": {
    // ...
    "ownershipTokenColumn": "Registration Unique ID"
  }
}
and present that value when creating the session:
Fliplet.Payments.Checkout.create({
  mode: 'payment',
  line_items: lineItems,
  client_reference_id: entryId.toString(),
  flPurchaseToken: registrationUniqueId
});
The stored value must be at least 16 bytes long (16 characters for plain ASCII values
such as UUIDs). A short or blank column authorises nothing, or every row with an empty
token would be claimable. flPurchaseToken is removed from the payload before it is forwarded to Stripe, so the secret is never
handed to a third party. A Fl-Purchase-Token request header is accepted too, for
callers that can set one.
If neither route succeeds the checkout is refused with a 403, and the buyer is never
sent to Stripe.
Enabling
paymentFulfilmenton an existing app turns this check on for the first time. If your app has anownershipTokenColumnbut its screens do not yet sendflPurchaseToken, and its access rules do not grant the buyer an update, every checkout will start failing. Ship the token first, then enable fulfilment.
Telling a failed payment from an unfinished one
When a checkout does not complete, the rejection carries one of two reasons, and they mean different things:
app.payments.error.paymentIncomplete— Stripe told us this checkout ended without a payment. A verdict.app.payments.error.paymentPending— we stopped watching before Stripe committed either way. The absence of a verdict; the payment may still succeed.
Treat them differently. Telling a buyer their card was not charged while the charge is
still in flight is how a second charge happens. On paymentPending, tell the buyer the
payment is still being confirmed and that they should not pay again — if the payment
does go through, the webhook records it.
Note also that a blocked pop-up surfaces as paymentIncomplete, because no Stripe page
ever opened. If buyers report this without having seen a payment form, check the
browser’s pop-up blocker before looking at the payment itself.
Advanced functionality
Check if payments have been configured for an app
Use the Configuration.exists() method to check whether payments have been configured for the app:
Fliplet.Payments.Configuration.exists().then(function (isConfigured) {
  if (isConfigured) {
    // Payments are configured
  } else {
    // Payments are not configured
  }
});
Customers and events
Create a customer
Use the following JS API to create a customer, or return the existing record when it already exists for the given email:
return Fliplet.Payments.Customers.create({
  email: 'nvalbusa@fliplet.com'
}).then(function(customer) {
  // Use customer as required
  console.log(customer);
});
Retrieve the list of payment-related events for a customer
Some providers are capable of returning a list of events made for a specific customer, including a list of successfull and failed charges. You can use the following JS API to retrieve a list of all logs generated for a customer:
Fliplet.Payments.Customers.getLogs({
  customer: 'cus_abcdefg123456'
}).then(function (logs) {
  // Use logs here
});
This is the full list of supported input parameters:
customer(String)limit(Number, defaults to 100)offset(Number, defaults to 0)where(Query object)
return Fliplet.Payments.Customers.getLogs({
  customer: 'cus_abcdefg123456',
  limit: 30,
  offset: 0,
  where: {
    type: 'payment_intent.created'
  }
}).then(function (logs) {

});
Open the customer billing portal on Stripe
Use the openBillingPortal JS API to redirect the user to the customer billing portal on Stripe. The promise will resolve once the user has returned to the app.
Fliplet.Payments.Customers.openBillingPortal({
  customer: 'cus_abcdefg123456'
});